Note - these directions are specific to the system used
at the Urban School, they are included as a model to be adopted by others
interested in creating similar projects.
Prerequisite: You have already transcribed text, divided
this into manageable "paragraphs" that are
generally less than 90 seconds in length, and created the Quicktime movie
clips associated with each text section.
Summary: You will now link the interview "paragraphs" to
the Quicktime movie files. This will allow the viewer to click on text to
launch the associated movie file. This is a tricky set of steps – go
slow at first until you get accustomed to the procedures.
Set-up File Structure
Up to now you have been
working solely off your laptop, but now it's time to begin sharing files
as we move into a more collaborative review and publish phase. You will
continue to work primarily from your laptop, however all your publishable
files will be uploaded to the fileserver – both for back-up and for sharing.
-
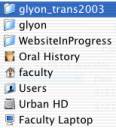
Logon to the fileserver and navigate
to: Students > Courses > History > Oral
History
-
Drag the "WebsiteInProgress" folder to your laptop desktop
-
Rename this folder by adding your initials to the end – like this: "WebsiteInProgressHL"
-
Open and explore the contents of this folder
Understanding the File Structure
Let's take a look at one example since understanding this will help you
as you begin to add movie and transcript files. For now, ignore everything
other than the actual interviewee's folder – in this case we look at Karl
Lyon.
Move in Your Movie Files
-
Go ahead and move all your movie files into the correct folder as per
the directions above.
- Check that they still work – open and make sure they play. If not – you
need to go back and re-save all the movies as "self-contained" – see "Creating
Movie Clips Using Quicktime."
-
Upload the movie files to the same folder on the server.
You need to work with your group members to MAKE SURE your
movie names are unique. If multiple people are working on the same transcript
tape – you
do NOT want to inadvertently replace other's with your movie files.
From now on you will work off of files on your laptop – but you will
UPLOAD NEW WORK to the server. This will both serve as a BACKUP as well as
allow
others to review your work.
Define a Site Within Dreamweaver
Dreamweaver works best
when you work within it's own unique file structure – called a "site." You
will now create your own site.
-
Launch Dreamweaver
- Choose "Site > New
Site"
- Name your site with a combination of your name
and the survivor's name – like
KarlLyon_Howard
- You do NOT want to work with "server technology"
- Choose "Edit local copies on my machine."
- When asked "Where on your computer do you want to store your files?" – click
the small folder icon and navigate to the "Website in Progress" folder
on your desktop.
- When asked "How do you want to connect to your remote
server?" choose "None."
- After clicking "Done" – a new
site window pops up.
As you continue to work with movie and text – do
this within Dreamweaver's site window. Always go to "Site > Site
Files" to open your site rather than navigating via Apple's file structure
(the "Finder").
Copy and Paste Transcripts into Dreamweaver
You now need to convert
the transcript sections from Listen & Type to Dreamweaver.
-
Launch Dreamweaver and open one of the blank transcript files (those
with the "xxx-xxx") within your survivor's folder.
-
Choose "Save-As" and rename it to match that segment of
the tape you are working with by simply replacing the x's with numbers
representing
minutes.
Example: "trans1b_25-62.html" means "transcript from
tape 1, from the 25 to 62 minute points. "b" just signifies SECOND interview.
-
Copy all the transcript from your
segment of the Listen & Type segment and paste it into this new file.
-
You should now have a Dreamweaver document that contains all the transcription
for that segment of the interview. The file name should match the content
as per #2 above. From here on out you will use this file to continue editing
the transcript as well as to insert the movie files.
Creating the Linked HTML Files
Eventually you are going
to make text clickable – when the user clicks any answer,
the corresponding movie will play in the top-right "movie
frame." You
first have to make a small html file (hypertext
markup language),
one that ends with ".html" for
every movie file. This can be tedious so we've created
a simple tool to do this for you.
- Download (drag and drop) to your desktop the tiny program
called "mov_to_html" – this is posted in the Oral History
folder on the server (Students>Courses>History>Oral History).
-
Locate the folder where all your movie files live.
-
Drag and drop this entire folder ONTO the "mov_to_html" icon

-
This should miraculously create paired files for all
your movies – the files will end in ".html" – wait several seconds – this
can take some time.
Note to other project adopters: The "mov_to_html" is
a small Applescript that automatically generates a new html file
based on the name of the movie file. We can send you a copy - just
let us know. info@tellingstories.org
Fixing the Format of Transcripts in Dreamweaver
 ONE last
step to prepare for linking text to movie files. You will notice that the
Dreamweaver-based transcripts look different. The following is the procedure
for fixing this prior to making the movie links. ONE last
step to prepare for linking text to movie files. You will notice that the
Dreamweaver-based transcripts look different. The following is the procedure
for fixing this prior to making the movie links.
- Open the transcript document
- Choose Edit > Find and Replace
(or Apple-F)
- Set the choices to match identically with those to the
right Click "Replace
All"
Magically all the questions and paragraphs will
separate out. Don't worry about the extra space between paragraphs – we will
fix this later.
Linking cut movies
 At this point you should have created a Dreamweaver "site" that
lives on your laptop, you have moved all your movie files into the correct
folders, you've copied and pasted all your transcript text into the correct
Dreamweaver files, and you've created the "Linked HTML" files
so that every movie file has a paired html file. Confused?
Ask for help – this is
complicated! Now for the actual link-up of text to movie. At this point you should have created a Dreamweaver "site" that
lives on your laptop, you have moved all your movie files into the correct
folders, you've copied and pasted all your transcript text into the correct
Dreamweaver files, and you've created the "Linked HTML" files
so that every movie file has a paired html file. Confused?
Ask for help – this is
complicated! Now for the actual link-up of text to movie.
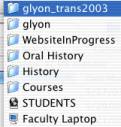
- Open
Dreamweaver and make sure you are looking at the SITE (Site > Site
Files) – you
should see something like the adjacent image.
If there are no files or folders within the "Site" folder – then
you need to re-do the step above – "Define
a Site in Dreamweaver."
-
Within this site - open the transcript
file you are working with.
- Make sure the "Properties" window
is open (Window>Properties).
-
Highlight ALL the text from the paragraph
you are linking from.
- In the "Properties" window – click
on the little folder icon to the right of the "Link" box – navigate
to find the matching file – be sure to link
to the "html" pair – NOT to
the ".mov" pair.
- In the "Target" box, enter "movie."
-
Keep doing this for all your movies.
Uploading Back to Server
This step should be performed several
times throughout this process until all your work is complete.
Recall, you should be completing all your work (new files, changes, link
creation)
on YOUR laptop with the "WebsiteInProgress" folder on your desktop (or
wherever else you moved it to). You then need to UPLOAD any NEW or CHANGED
files to the server version ("upload" means to push files
from your computer to another, i.e., the server – "download" is the reverse – means
to pull files into your computer).
- Logon to the server and navigate
to the "WebsiteInProgress" folder
on the server
- (Students > Courses > History > Oral History > WebsiteInProgress) – go
as far as opening the folder that contains (or will contain) your
filesOpen the same paired folder that lives on your laptop
-
Drag and drop any new or changed files from your laptop to the
server version
-
If you already had previous files
with the same name in the DESTINATION you will be prompted with a message
asking you to confirm that you want
to replace the existing files with the NEW
versions. Read this carefully – think
this through – and if you have doubts,
ask for help.
Yes, this can be a bit of an organizational challenge.
The trick it to close or minimize ALL but the 2 windows – the DESTINATION
window (the server version) and the SOURCE window (the laptop version). Hold
the APPLE key and click on the title of an open window to see it's path,
like these two:
|
SOURCE
this lives on my laptop
|
DESTINATION
this lives on the Fileserver
|
Remember – only those files stored on the server
are SAFE unless you have burned back-up CD's. Do this often.
Previewing Movie Clips in the Browser
In order to verify that the movies will properly
load when the user clicks a transcript link – you need to follow these directions.
- Within Dreamweaver's
SITE window, find and OPEN the file within your subject's window called "frameset.html." For example there is a file called "max_frameset.html" within
the "mgarcia" folder.
- You may
get an error like this one OR you may see the wrong page
load – no problem
 – just
keep reading... – just
keep reading...
- Choose "File > Open
in FrameÉ" and navigate to the TRANSRIPT file that you want to preview.
- IF
you are prompted to "copy the file to your document folder now" – click
CANCEL
- You
should now see the transcript frame appear – now click
the "Preview" icon
in Dreameaver's toolbar – looks like this:

- The
first time you do this you may be prompted to find your
internet browser – read
and follow the directions on screen to correctly "point" the "Internet
Explorer" – which
lives in the "Applications" folder.
You should now be able to navigate through your
transcript page. Check that all your movies correctly work and that they
load in the top-right "movie" frame. Report those that are not working.
|